Sunday, August 13, 2017

Ox Gall Medium

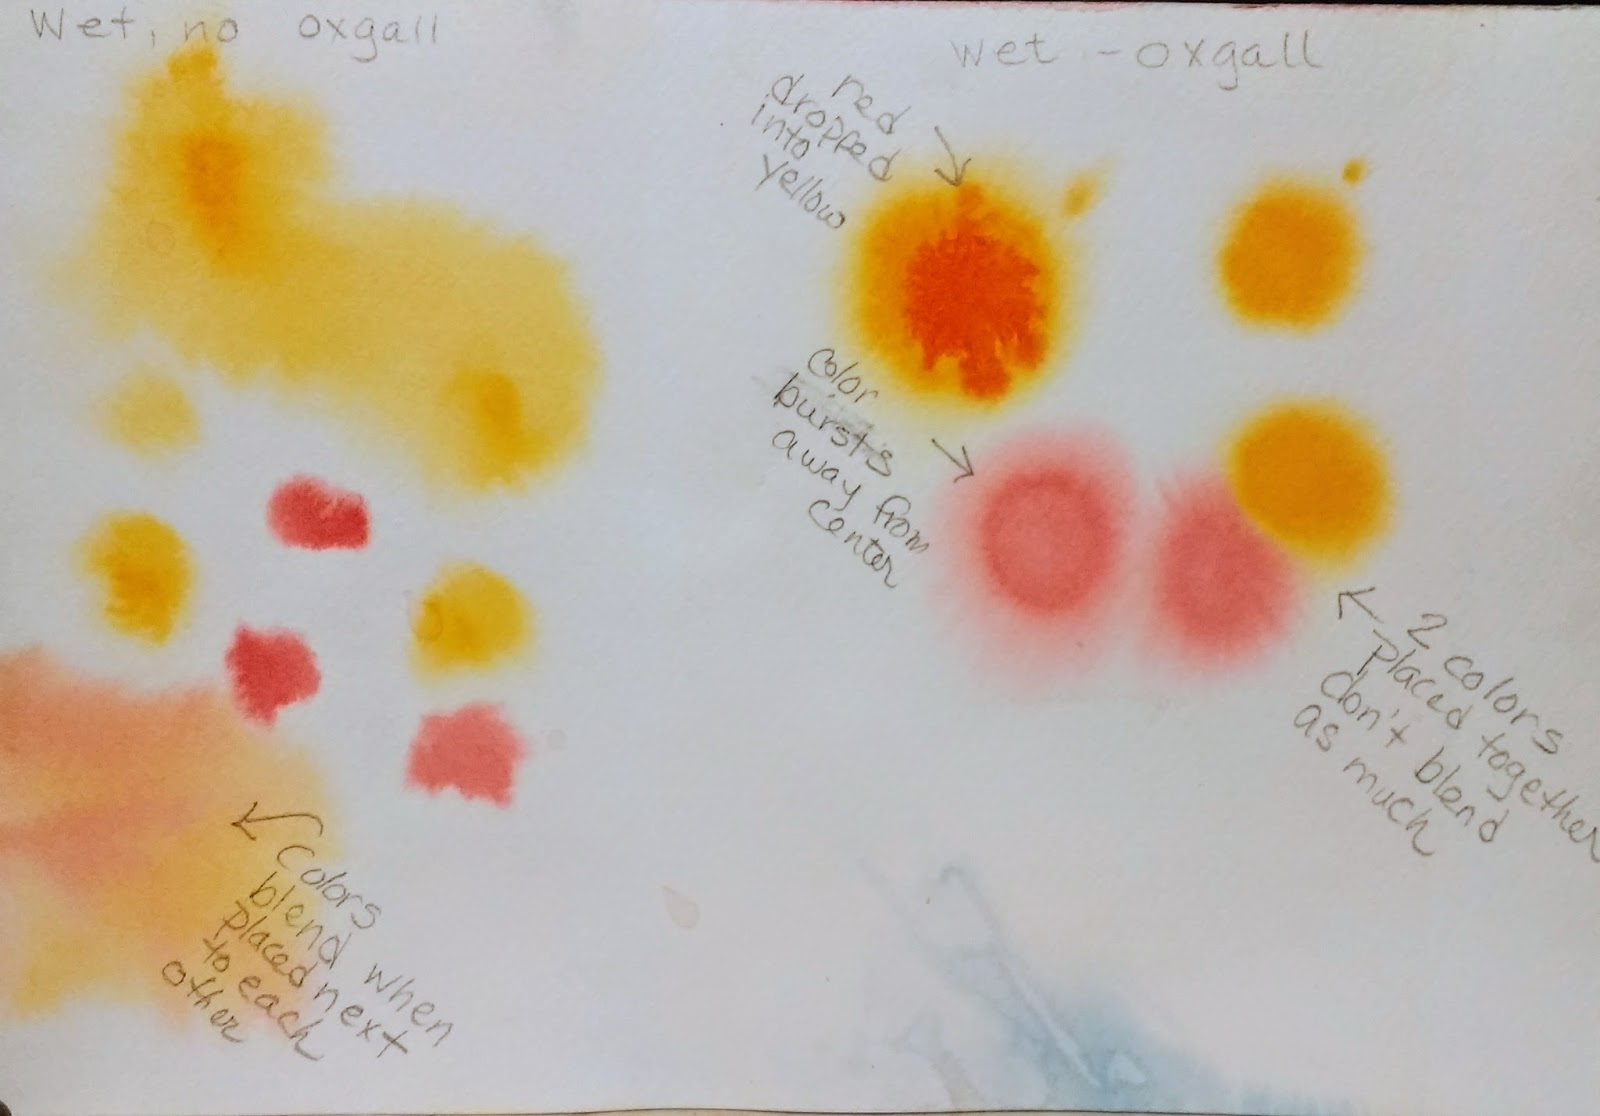
The medium I used on this week's test is Ox Gall. It is literally from cow gall bladder, but there are synthetic versions. It is commonly used in liquid version, but Lukas makes a pan version for under $4.
Most watercolor contains three things, besides the color: gum arabic, glycerin, and oxgall. The gum arabic and glycerin help it to bind to the paper, and the oxgall helps the paint move around.
Oxgall is considered a "wetting solution," which seems like an oxymoron to me, since it actually makes the paint dry faster. It seems its best use would be en plain aire under humid conditions, like Florida, where your paper just doesn't want to dry.

Directions call for you to use it straight to wet your paint instead of water. Here is a way to test what you can do with oxgall. First wet some wc paper and drop in plain color with nothing added but water. Watch how the paint moves around and blends. Do the same thing, only wet your paint with oxgall and drop it into wet paper. Notice how the paint spreads differently, like bursts of fireworks. The center of the drop pulls quickly away, drying rather quickly. (it loses its shine). If you set one color next to another, instead of blending like the first sample of paint, the paints tend to pull away from each other, not blending much. If you drop one color in the middle of another color burst, the colors tend to not blend much. They want to retain their own identity.

Friday, August 4, 2017

TESTING GRANULATING MEDIUM

I'm on a mission to try to understand the uses of the watercolor mediums I've seen in stores and in artist catalogs. So each week, I'll explore one new medium. dick blick has them on sale right now, so I figured it was a good time to explore.

The medium of the week this time is GRANULATION MEDIUM. Several companies make it, but the brand I tested is Winsor Newton. 

WHAT IS GRANULATION? It makes the appearance of having tiny GRAINS in the paint, small particles of sediment that separate and sink into the grain of the paper. You usually notice the sedimentary quality in paint with more water in it. TO TEST the colors in your palette for sediment or granulating properties, make a swatch of your colors. Make the swatch big enough to paint from dark to light. If it granulates, you will see tiny particles separating into the texture of the paper.

I made a list of some of the very granulating colors and the staining colors. You  might want a granulating color for creating great textures in things such as trees, wooden barns, a sandy beach. But you might NOT want a granulating (sedimentary) color for a child's face or a shiny metallic object.

SEDIMENTARY COLORS
Yellow Ochre, Raw Sienna, Burnt Umber
Lunar Earth, Burnt Sienna
Cadmium Red medium, Pink Color
Cadmium Red deep, Rose of Ultramarine
Cote d’Azur violet, Cobalt violet
Cobalt violet deep, Ultramarine violet
French Ultramarine, Cobalt Blue
Cerulean, Graphite Gray, Lunar Black
Manganese Blue, Cobalt Teal Blue
Cobalt Turquoise,
Cobalt Green Pale, Terre Verte, Viridian, Bohemian Green Earth
Raw Umber, Sepia, Undersea Green
Rich Green Gold
OTHER SEDIMENTARY COLORS
Earth colors
“genuines”
Oxides and ochres
Contain PBR7 (siennas and umbers), PB29 (FUM), PB 35 (Cerulean)

Some brands don’t granulate as much as others, especially those with honey. Also, student grade with a lot of fillers will granulate less.

*************  
Below is a sample of my experiment. I used French Ultramarine, which is already a sedimentary color, and Quinacridone Coral, which is very smooth. The first rectangle on the left is the color by itself on cold press paper. Rectangle #2 is with salt. Rectangle # 3 is spritzed with water. And #4 is sprayed with granulation medium. (you can add granulation medium directly to your paint instead of spraying it.) The non sedimentary paint granulated; the sedimentary paint granulated even more.


CAUTION: Keep any paints that you mix this medium with in a separate palette or container. If you don't, you will get it into your other paints. Also wash the brush really well before reusing for your normal painting. 

Directions for this medium call for using it full strength with your paints from the tube, diluting your paint with the medium instead of water. But I liked putting it in a small squirt bottle. I didn't have to worry about contaminating my other paints or my brushes. Just squirt onto wet or damp paint.

Granulation does not change the actual feel of the paper. Texture medium does, but I'll discuss that another week.

CONCLUSIONS: I liked using the granulation medium. The results were pretty noticeable. And using it in a spray was easy. I don't like how pricey it seems, but you don't use much, and it goes a long way. This is one of the more expensive mediums. Dick Blick's price this week/month was about $8.48 for 75 ml bottle, much better than the $12 I paid at Hobby Lobby AFTER my 40% coupon. 

How much will I use it? Probably not on portraits, except on beards or hair. But I'll use it on about half my paintings.

SOME MORE ABOUT NEGATIVE PAINTING


You can read about some more negative painting on the 6/3/16 and 5/26/16 blog posts. This one is similar, but different. In this one, each layer is drawn on one at a time to avoid confusion. Also, every negative space is painted the new value for each layer.

You can also read about negative painting in Linda Kemp's books: Painting Outside the Lines and others. I understand that she has a tutorial of the tree project on you tube, but I have not seen it.

STEP ONE:
Begin by creating a foundation. Some might consider it a background or underpainting.
Paint wet into wet an underpainting using three or four colors. (You will use only these colors for the entire project.) Use some of the texture techniques we've talked about: salt/spray water or granulating medium/wax paper/saran wrap/bubble wrap/spackling/etc. You are not trying to make it dark, but a pretty light value. Dry completely.

Note: Linda Kemp wets both sides of the paper and puts it on plexiglas to keep it moist while painting this foundation. You remove it from the plexiglas when you are ready for it to dry.

STEP 2:
After drying, sketch out your first layer of simple shapes, in this case a few trees for the foreground.
Here is a pattern if you don't feel comfortable without one.


Using the same colors you used for the underpainting, paint the SPACES BETWEEN the tree and limbs. Those are the NEGATIVE spaces. This part should be about two values darker than the first underpainting. When finished, you should see a lot of the textures showing up in your first trees.

Step THREE: Draw some more trees and some ground higher up above the first layer of ground. (This helps strengthen the illusion of distance: Things below your eye level rise from the bottom in the distance; things above your eye level appear to get lower from the top in the distance.) Use paint another value or two darker than the first time. Again, paint ONLY the NEGATIVE spaces between branches and trees,  NOT THE TREES THEMSELVES.  If you are doing monochrome, just use less water in your paint. With each successive layer, you should also neutralize your paints, to reinforce the effect of distance.

In this pattern of the second layer, the dots represent your first layer of trees. Notice the overlapping of the limbs.


This picture shows the original underpainting(using bubble wrap and pencil shavings for texture),
the first layer of paint, and the beginning of the second layer on the right side. The colors I used were quin coral, cerulean, hansa yellow.


Step 3: When the painting is dry, put in another layer of trees, making them smaller than the others, and making the branches wind behind the others. Again, using the same paints as before, use an even darker value to paint the last layer of paint.

Above is a finished tree project. (See how the ground rises with each successive layer)
Below is a picture of leaves using the same technique. These two are my paintings.


Below are examples of other artists' work using this particular method of negative painting.


Thursday, June 29, 2017

POPPY ON ARCHES BOARD

THIS POPPY is what I would consider a botanical painting: realistic, includes the buds and leaf shapes for identification, no background except the white. This poppy is a combination of one I found on Pixabay and a photo I took. 


COLORS USED: permanent rose (or magenta); quin coral; new gamboge; cobalt or cerulean blue; dioxizine purple or you can mix magenta and cobalt. For QoR lovers you can crack open your transparent pyrol orange. BRUSHES: I used a #8 round throughout and a small lifting brush at the end; also a small fan brush. 

STEP ONE

Sketch or trace the poppy onto Arches board. Miskit a few white drops in the center. Wet the petals and apply yellows and reds wet into wet. Before it can dry, wrinkle a piece of plastic wrap, tracing paper, or wax paper and press it over the flower. Weigh it down and allow it to dry until you have a wrinkled effect.

While waiting for that to dry, glaze a green made from new gamboge and cerulean over the buds. Apply a light wash of purple (made from magenta and cerulean or cobalt) to the sides. These are just underglazes. Also glaze green over the stems and leaves. In the leaves, try to leave a thin white line down the middle. I also added drops of cobalt into the wet green mixture.
When the petals are dry glaze over the center with a light purple, leaving tiny bits of white. (In this picture it looks darker; but I wanted to do it with purple.) While the purple is wet, pull some of the paint up at the top of the dark center with a thirsty brush, leaving a lighter purple. Remove miskit when dry.


STEP TWO

Check your reference and find the darkest parts of the flower. (especially near the center, underneath other petals, etc.) Paint those in with Quin coral, and fade the color out gently with water. Find the deepest wrinkles and paint those in: hard line on one side, softened away on the other. 
TIP: When painting or drawing in the crinkles, paint them emanating from the center and curving in the direction of the petals. Don't try to space them too evenly apart, not the same length or width. To paint a crease, paint a hard edge on one side and soften the other side with water. (You will use that in clothing folds, flowers, etc.)


Continue to deepen darks in the creases. On the right side, the deep part of the petals
should have a deeper red, such as alizarin crimson; or make it by adding some purple to your reds.


STEP THREE

After all your creases are done, wash over the flower with some transparent pyrol orange (or a mix of coral and new gamboge.)


STEP FOUR: THE BUDS, STEMS
Darken the green mix that you used before by adding a little blue. Wash that over the buds, and while damp, add some purple along the sides. Before that loses its shine USE YOUR FAN BRUSH to lightly pull out some "hairs" along the edges. Do the same with the stems: Lay down the green, and while wet, add purplein shaded areas (along one side and underneath where stems cross or go behind a bud or flower). Before it loses its shine use the fan brush again to pull out "hairs" or fuzz from the stems. Also strengthen the greens in the leaves, adding some cobalt or purple in more shaded areas.
Darken the stem underneath the flower with some orange. Also glaze some orange over the bottom leaf where it might reflect the color of the poppy.


FINISHING UP

Since I can never leave a flower alone, I used my scrub brush and clean water to first get rid of any spots/drops of paint that reached the white surface. Then I chose a few wrinkles to hilight by lifting paint from the top part of the wrinkle. Concentrate on the ones that you want to appear to come forward. I also lifted a bit on the part of the bud stems that curve downward, where the sun would hit them, and a bit on the left side. 

Thursday, June 22, 2017

CLASS DATES AT THE BARN IN MARIEMONT

CLASSES AT THE BARN 2017

HERE IS THE PROPOSED CLASS SCHEDULE:

JUNE 29: LAST CLASS OF THIS SESSION

JULY: NO CLASS DUE TO KIDS CAMPS AT THE BARN

AUGUST 3 - SEPTEMBER 21: 8 WEEK SESSION

SEPTEMBER 28: PROBABLY A BREAK

OCTOBER 5 - NOVEMBER 16: 7 WEEK SESSION

NO FURTHER CLASSES IN NOVEMBER & DECEMBEr

Prothonotary Warbler Part 2

GLAZING THE WOOD STUMPS & BRANCH


First use paynes gray OR blue with sienna to paint the darkest crevices and places where the wood is shadowed or separated. Let this dry. Then use warm brown (can be burnt sienna with French ultra marine, or lunar earth, or ochre with blue in it) to glaze over the wood stumps. Before it dries use one or more of these texture techniques: sprinkle with salt; spatter with water drops; spatter with other colors. Let it dry again. Leave the stem lighter for now except for an underpainting where the shadow underneath will be. One student just used a dry-brush technique,  below, which worked well also. Another student wanted a blue-grey for the stumps, also below.

(dry-brushed logs)

(blue-gray logs)

To finish the wood, strenghthen the darks in the crevices and dry brush some of the bark. Spatter some on the dry paint. You can also make dark marks and lines to create bark. 


I wanted to recreate a wetlands look, since these birds live and nest in the bark in the Oxbow area near our home. To make it look like the stumps are in flooded waters, I put a muddy blue/green wash for the water. I darkened the bottoms of the stumps, at the water line to make it look wetter. I painted a reflection of the stumps in the water. Then I lifted horizontal lines in the water to create ripples. I did also paint some water grasses and their reflections in the water. 

CREATING A "BOKEH" EFFECT BACKGROUND

Bokeh is an effect achieved through certain camera lenses that put an object in sharp focus, but blur the background. That blurred background is the bokeh. This part will require:
  1. about 15 minutes of uninterrupted time
  2. two containers of water, one clean, one for rinsing
  3. TWO brushes: one for applying paint, one for applying clean water
  4. 3 colors in well-dissolved puddles
  5. (I used cerulean, hansa yellow, dioxozine purple)

  6. You don't want to be trying to reconstitute paint while your doing this.This is wet on wet. You want wet, shiny, but not puddles. Wet an area with your clean brush, going an inch or 2 beyond where you will drop paint. Your paint will go where you have put the water. Then drop in cerulean, adding a little yellow. Add some purple in areas that you want a darker contrast.
Continue working around the birds, always keeping the leading edge wet so that you can continually add paint. If you get blossoms, you can either add more (by spattering water drops onto damp paint) or wait until they dry and gently blend them in. Please remember the 3" rule: don't go more than 3" before making a change in your color. 


FINISHING TOUCHES & TIPS
When the background is dry, soften the downy feathers of the birds in the head and breast areas. You can use a scrubbing brush or just a softer lifting brush. This will create a soft blend of the background with the birds.
If your stumps need to have some light on them, tear a length of masking tape in half lengthewise. Tape half of the tape on the left side of the crack you want to make and the other half of the tape on the right side. Run a wet lifting brush along the crack in the tape, and when it is dry, remove the tape.
This is a good method for getting back some of your lights on a rought texture.
Darken the shadowed part of the stem, if you have one. 
Strenghthen the shadows underneath the wings. Be sure the eyes are very dark. Create some little feathers in the tops of the wings. Paint the legs with a blue gray, leaving some white for hightlight.


Friday, June 16, 2017

Prothonotary Warblers

In honor of the Oxbow show that Southeastern Indiana Art Guild is participating in next week, we are painting two warblers that live and nest in our little wetlands in Indiana/Cincinnati area. Using a photo found on pixabay (website for free usage of photos), we started with a sketch. I got some good tips from The Mind of Watercolor on drawing these birds. #1: Use watercolor pencil the color of the bird or #2: after drawing, lighten the pencil lines with gum eraser. Since these are yellow birds, I and pencil lines would definitely show through, I thought these were good tips.

YES, I FINALLY USED PAYNES GRAY!
To show a little bit about GLAZING and UNDERPAINTING, I used paynes gray, very lightly, to shade the underbelly. It is hard to make yellows go to a dark enough value to show roundness, so you often have to "push" the color a bit. The bird on the left is underpainted with a bit of paynes gray on the underside. The bird on the right is underpainted with yellow ochre mixed with paynes gray. You can also use a light violet mix made from cobalt blue and magenta. DRY COMPLETELY, as this is a glaze technique.
If you want, you can underpaint the top wing feathers with an olive green. In class we did the yellow first, then added green.

Using two yellows (I used Hansa light and New Gamboge), paint the heads and bellies of the birds. Start with the light, then add New Gamboge in the more shaded areas as you go. Let it dry. Then add as many layers of yellows as you need to get the effect you want. Paint the yellow over the green top feathers. (Prothonotary Warblers males are warmer yellow while females are more lemon yellow). If you want to add some quin gold in some shaded areas, that looks good too. 
I was pleased with how the underpainting contributed to the round feeling of the birds.


THE WINGS
Bird wings are generally in three sections: short, fat wings over the "shoulder" area; longer feathers just beneath that; and the longest flight feathers last of all. If a bird has a short tail and long flight feathers, you will often see the flight feathers look crossed in the back. 
Starting with the tail area, put a glaze of cobalt blue over the wing feathers, gradually blending them out in the shoulder area so there is no definite line. On the right bird I did short strokes of cobalt, painting in the direction of the feathers, so I could leave tiny bits of white.  When it is dry, use a darker mix of blue to make the lines between the feathers. The shoulder feathers just have soft short lines that are softened away. The other feathers have hard small lines. Try to leave bits of white if you did not mask out any whites.

You will want to emphasize the space between the wing and the body. I used burnt orange to paint along the edge of the wing and body, then added French ultramarine and blended out toward the body, leaving a hard edge against the wing, but softening it toward the belly. (you can just mix some yellow and red for the orange.) I wish now that I'd let the orange dry first, then put in the blue, because it bled more than I wanted, and I'll have to clean up the backrun it made.
Mix a dark blue with burnt umber (or indigo) and carefully paint in the eyes, being sure to leave a white hilight. Paint the beaks with this dark color. For the beak on the right hand bird, just paint the bottom beak and the nostril on the top. Dry, then glaze with a bit of cobalt so there is some difference between the two. 


NEXT WEEK: FINISH THE BIRD AND BACKGROUND