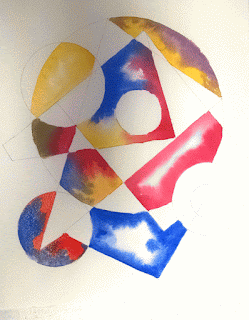
INSTRUCTIONS FOR JOYE MOON’S PROJECT USING SHAPES
Credit for this project goes to Joye Moon. In her book,
Exploring Textures in Watercolor, Joye Moon shows this project and many more in
an easy to understand format.
- Draw shapes on your paper, making them overlap and creating new shapes. Use circles, squares, triangles, etc. Make sure you have some large, some medium, and some small shapes.
2. Wet a
larger shape with water. Charge in a primary
color along the edges,
allowing it to bleed into the
center, leaving the center mostly white and
creating
variations of the shade. Repeat this with the other two
primary
colors on two other larger shapes. This created
a “modeled” shape that
gives the illusion of volume,
instead of looking flat.
The edges that you create on the outer part of the shape
is a "hard edge. It defines a shape. The soft parts on
the inside are "soft edges," sometimes called "lost edges."
3. Try some with putting red in one corner,
blue in another, and yellow in another. Notice the
beautiful neutrals this creates.

4. Choose three other shapes. In each of those, wet each shape, one at a time. Put one primary color at one corner and another primary color at another edge. Allow the colors to co-mingle on the wet surface to create greens, violets, and oranges. Be sure that you paint only next to an edge that is dried.
6. The rest of the shapes are painted “flat,” without wetting the paper first. Try to find sections where you can add an analogous (or neighboring) color. For example, put a red near an orange or purple.
7. Leave
some of the shapes as unpainted spaces to create a more interesting
design.
Wet-into-wet primary
colors painting only on very wet or very dry paper
Charging mixing
colors using the largest brush that will do the job
Neutrals painting
only on very wet or very dry surfaces
Hard edges soft edges
Hope you enjoyed this introduction to water color!


No comments:
Post a Comment