Here are the steps to completing the rose painting we started in class.
In the first picture we had already copied the picture. You can see where we applied cobalt on the red rose on areas that would face the sky. We applied some quinacridone gold on areas of the red rose that will be the warmest, the areas nearest the heart of the rose.
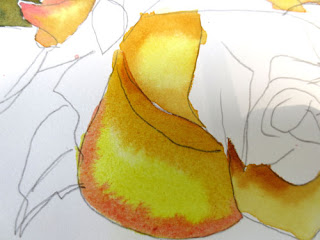
On the yellow rose, we wet each petal, one at a time, then painted some hansa yellow (or another cool yellow) in the center of the petal. Then we applied quin gold to the center, warmer part of the petal, and some red along the edge. The red is a thicker when it is painted in. Remember, the wetter the paint, the lighter it will be when it dries.
While it is still wet, apply more red to the outer edge and more quin gold to the center.
Use the above technique on each petal, one at a time, working around the rose so that you are never working next to a wet petal. I like to leave tiny bits of white on the edges of some petals. This just gives some sparkle to the painting.
In this picture, I have darkened some of the red areas and added more quin gold to the deeper or shadowed parts of the yellow flower. I am using Quin Gold because you can get a deeper value in the shadows than other yellows. Remember, you can't get a darker value than the color that comes straight out of the tube.
You can see in the red rose that I have begun to add reds to the petals. Where we had underpainted with gold, the colors look warmer, and where we underpainted with cobalt blue, the colors look cooler.
In the above picture I have finished washing reds over the entire rose. I've added some darks to separate the two roses even further on the very bottom red petal and on the very top.
To paint the leaves, I wet the leaf and put a light wash of cobalt blue.
I then applied quin gold over the cobalt, adding in a dab of red on the most shadowed parts of the leaf and yellow on the tips that would get more sun.
Next I painted the rose bud, wetting it all over, then just applying red on the outside and letting it blend into the center, keeping the center fairly white. When it dried, I added a thicker blend of red to the center and shadows.
After I was sure I had all the paint where I wanted it, I began to gently lift in places I wanted to have highlights or be softened, especially where the petal might curve.
I added a background because I could not get some pesky spots off the white paper. I just got a large area wet, washed in some cobalt, and added some watery reds. Then I created some "blossoms" by dropping water drops into paint that was almost but not quite dry.
Last picture! The background didn't hide those spots well enough, so I added two leaves under teh red rose. I blushed on some red in parts of the yellow rose. Then I discovered I'd completely left out one of the petals! (See if you can tell the difference!) So Ipainted that in too. Voila! Done at last!


No comments:
Post a Comment