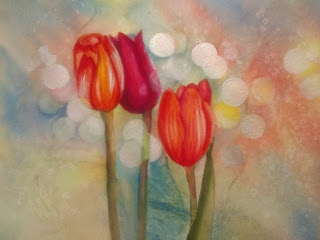
#1 Draw the details on the flowers.
#2 Gently lift stems if needed
Cut a piece of masking tape in half, slightly curved to resemble a stem.
Set one piecee of masking tape on each side of the stem.
Using a magic eraser, GENTLY lift some of the stem. When dry remove the masking tape.
If you rub too hard, you will remove the sizing of the paper, making it hard to paint over.
#3 Begin by lifting some circle shapes from the background.
Use a circle stencil and a magic eraser to gently remove paint from circles in areas you want to
be out of focus. You may want to draw them on so you can create a pleasing pattern. If you lack a stencil, you can make one from plastic or just freehand them.
Here you can see a pattern of circles- the "specular" effect of bokeh.
#4 Begin painting your tulips. I wet each one and put a base of yellow and coral, allowing the colors to run together. I also painted stems using lemon yellow and French ultramarine.
I added a base of alizarin crimson on the middle tulip.
OOPS! I discovered how off balance that middle tulip is. So I used magic eraser to remove
paint to move the stem. BUT It took off some sizing, and wouldn't take more paint. So now what?
I used something called "watercolor ground," which allows you to repair the paper, but you have to let it dry overnight.
Meantime, I separated the tulip petals. I wet the line along the side of a petal, added darker paint, then blended it out onto the next petal.
You can see three things in this picture below. First, I deepened the color on each tulip, and each time I did, I continued to separate petals. You can see on the right tulip that I scored some lines on the petals to indicate veins. This was done by wetting the petal, adding paint, and then, carefully following the form of the tulip, using the sharp point of a cut credit card to score some dark veins.
The third thing you see here is that I've added a few more circles, this time with gouache, and a few of them with Watercolor ground. I used a round sponge on a stick called a spouncer to apply it.
I wasn't happy with the red tulip. I used a little cobalt blue to separate the petals and darken the bottom. I did a little lifting on the tulips to bring some hightlights into the painting. I also began dropping color into some of the circles.
On the left, you can see where I've negative painted cobalt blue around some of the circles to bring them out a little more.
I added some opera rose to make the red rose pinker. Then, usuing a bit of gouache, I added some white highlights to the tulips. I softened some of the edges of the circles.You can add more color to the circles, if you choose, adding as many or as few circles as you like.

RECAP OF SOME OF THE THINGS LEARNED FROM THIS:
1. You can create bokeh with stencils, by removing paint, by painting gouache with a round "spouncer" sponge, or by using watercolor ground. You can also use certain white inks used by stampers. (but that's not a product I have on hand)
2. How to separate the petals of a flower by blending.
3. How to make smooth, natural looking flower petals wet into wet.
4. How to use a credit card to create small veins in petals.
5. How to remove paint using a magic eraser and either tape or stencils.


No comments:
Post a Comment