MASA PAPER is an inexpensive, machine made, Japanese "rice" paper that is interesting to work with. You can see my other blogs on masa paper projects for more information, but basically it is a thin, soft, acid free paper made of sulphite pulp. It is often used in printing processes.
I always begin by making a small X in one corner with pen on the wrong (smooth) side, so that, after getting it wet, I'll be able to tell which is the right side.
CHOOSE: You can either draw your pattern on before you wrinkle the paper or afterward. The advantage of the first is that it is easier to draw on smooth paper. The advantage of the second is that you can look at the underpainting and decide where to put parts of your drawing. You can also choose to use MICRON or ULTRAFINE SHARPIE to outline your pattern if you like the pen and wash style.
Then I wad up the paper into a ball, just as if you were going to wad up trash. Then I soak it a bit in water, just long enough to get the entire thing wet.
I put the wet paper on an absorbant surface, like a puppy training pad or paper towels, and appy a soft underpainting. My object is to have an interesting color flow no edges, not too dark. It always dries lighter because of the large amount of water in the paint.
I like having no lines on the paper to tell me where to put color when I first start out. I really like the unexpected colors that can happen if you don't over plan. You can leave whites where you really need them.
You can't use masking fluid, but you can do a small amount of lifting. You want to use a very soft brush on this to avoid "pilling," which occurs when you over-brush the paper.
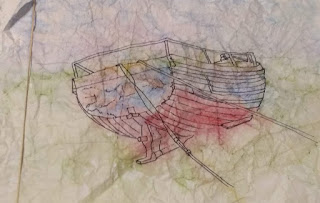
On the painting below, I chose to ink the image first, then do an underpainting. Dry the underpainting.
Then I brushed in blues, reds, and browns as I saw them in the reference photo. Expect some "bleeding" from one area to the other.
I used cobalt blue on the blue areas, alizarin on the reds, new gamboge with some brown in it for the yellows. On the first layer, as I did the blues, I dropped some burnt sienna in areas to give it a more aged look.
For the second pass of color, I added some purple and burnt umber to the bottom of the boat and in aeas that were in deep shadow. I darkened the blue on the back of the boat. Added some burnt umber drybrushed on the wood around the rim. With French ultramarine, I added a dark shadow under the ropes, and deepened the dark inside the boat on the far right.


No comments:
Post a Comment