Kathy George does a technique she calls "fracturing the picture plane." To explain, imagine that you have dropped a piece of glass or mirror onto a picture and broken it. The pieces will look a bit distorted along the fractures.
Another way to think of it is to picture yourself standing in front of a store window. You can see objects clearly through the glass. You also see things in front of the glass, but more in focus. But there is another dimension: the reflection of what is behind you is also seen in the glass, distorting your view of the objects inside.
I have simplified the process a little to understand it better. To begin to understand it, draw a simple picture, about 5 x 5. Then grid it to look like a relaxed tic tac toe board.


Take one piece of the grid at a time. Color the first part of the grid. Then, where it changes along the "fracture" line, color that section of the grid-- Only CHANGE something about that new section. You can change COLOR, or VALUE or DETAIL/TEXTURE. Do this with each section so that each one looks distinct from the others. It will be easier if you take one row at a time.
I did this sample in colored pencil to get a quick idea of the process. I didn't want to wait for paint to dry before working on the next section. It took about 20 minutes, start to finish.
0n the one below, I began with the top left, coloring the apple section orange and the background blue. Next I went to the mid top section, changing the apple to red, coloring the straw green, and the inside of the glass orange and brown. On the right top side, I did the background light blue with pattern of dots (changing the DETAIL), colored the liquid in the glass brown and orange (CHANGING COLOR), and kept the straw green.
Then I started on the middle section, mostly changing colors. On the bottom section I changed pattern, which is a change in detail. The only places where I changed VALUE was in the straw (darker green in the id section) and in the apple dark pink and light pink.
The Big Project
Now I'm ready to start the main project.
You can choose to gesso the paper ahead of time or just paint on watercolor paper. You have to do this in advance, bc the gesso must dry completely.
If you choose to paint on gesso, apply it to water color paper...even the not-so-good stuff. You can brush it on and impress textures into it. On mine, I pressed corrugated cardboard and drug a comb through parts. On others I impressed a stencil or bubble wrap. Also, you can leave part without gesso. In those parts, the paint will absorb differently and automatically create texture.
Paint will react differently on the gessoed parts, sort of a slip and slide. But at least it is easy to lift if you don't like the color or make a mistake. You will use less water in your watercolor paint. Another thing you will notice is that the gessoed paper does not warp or buckle.
After gesso has dried, draw your sketch onto it. My light box will work on gessoed paper.
Then I created a grid on it. In class we used a clear plastic cover over it, making the grid on the cover with dry erase marker. When you are happy with it, make the same grid in pencil (or water color pencil) onto the gessoed sketch. I can make additional "fractures" as I go along and decide it is needed.
On this one, I used the drawing in the practice, but added a little kokechi doll.
Pattern
Fractured painting
This one I used the pattern from a previous drawing.
Here are some examples from Kathy George's class.
On the one below, the foreground isn't fractured at all....only the background. Note additional fractures that were created after the original grid.
reference
sketch
final picture. Notice the repetition of the horizontal stripes creates a kind of unity. This one also created additional fractures after the original grid was mapped out.
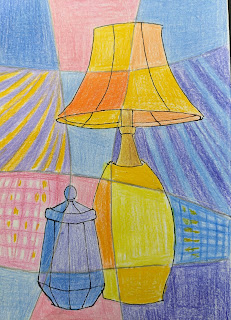
just used a few shapes (light bulbs) repeated
see how some shapes (like the left bottle on bottom, the flower foreground, and the creamer) are not fractured at every division. This pushes them to the foreground.
There is a mural in Lawrenceburg near me that shows a version of this idea.
Notice how sometimes the artist chooses to change a color and sometimes he chooses to leave an object the same color, even into a fractured area.
Any watercolor on GESSO will have to be set with a clear coat of acrylic spray or varnish to protect it from moisture. Until you do, you can make as many changes in the paint as you wish.


No comments:
Post a Comment