Friday, January 25, 2019

Masa Paper and YES Paste


We started another masa paper project. The basics have been posted in previous blogs. 
I just wanted to add some things I've learned.

After finishing most of the painting - I like to paint a lot before adhering it to another surface - I'm ready to glue it to a surface. In the past I've used Alene's glue or matte medium. This time I wanted to try YES paste. This is not cheap, but it is archival, and book binders use it.

YES paste is very thick, and looks a bit like petroleum jelly, only thicker. It can be thinned, but I decided to use it the way it came from the jar. Using a wide blade palette knife, I scooped it out onto my surface. (You can put this on any archival surface: watercolor paper, art board, treated wood panels, canvas board,etc. ) I then used a squeegie to spread it around. 

I set the masa painting over the glued surface, centering it, then pressed gently. When it was in place, I set wax paper over it all and, starting in the center and working outward, I used a roller to flatten and remove air pockets.

I was pretty pleased that my paper did not buckle because there is little moisture in the paste. It dried much faster, and I was able to continue to work on the painting sooner. 
PS: I ordered YES paste from dickblick.com and it cost about $12 for a pint.

FINISHING A PAINTING


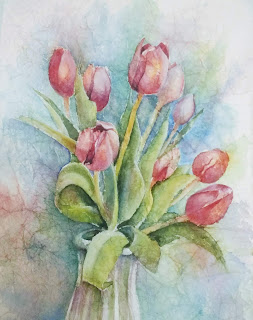
You can continue to work on your painting even after mounting. You can very gently lift areas, add more paint, etc. If you have tiny details, you may want to use some watercolor pencil to define those areas. Or pen and ink. On the picture above I did use some goauche white to calm down some areas. 

If you feel like you've totally lost an area, try this to reclaim it: use some scrap of masa paper cut or torn into a shape you need, paste it over the overworked or unwanted area with glue or matte medium, and when it is dry, repaint it. 

Saturday, January 12, 2019

MORE MOISTURE FOLLOWS LESS MOISTURE?

My first winter session at the Barn started Thursday. I wanted to do something with fog and mist.

First we talked about what it means for "more moisture to follow less moisture." That always confuses me. So I think of it as a sponge. If you have a puddle to clean up, would you use a dry sponge or slighly damp sponge to pick it up? Answer: a slightly damp sponge will wick up the puddle quicker than a dry sponge. The area of more moisture--the puddle--is drawn into the less moisture of a damp sponge. It will resist the dry sponge. (And yes, my students said they'd just use a towel.)

If you have too much water or paint on the paper and need to pick it up, you have two choices: you can dab it with a paper towel or tissue, which can leave the paper with a hard edge, sometimes soaking up all the color. Or you can attack it with a "thirsty" brush: one that has been dampened, but the excess water squeezed out of it. That will soak up extra paint and water leaving a softer edge. Both methods have their uses.

Another reason to remember this is when you are trying to create a smooth wash. If you have wet the paper, the paint is going to be attracted to the less wet...but not dry...areas.

If you are getting (or want to get) blossom effects, it is because an area that is wetter is placed next to an area that is drying but still damp, and the wetter area is trying to move into the damp area, creating blossoms.

Also, this concept is used to create soft edges in things such as fur, shadows, sunsets, and fog.

This idea is necessary to keep in mind if you want to create a picture with fog, mist, or "lost edges."


This picture was inspired by watching two other artists work on foggy pictures. One is David R. Smith, and the other is the Frugal Crafter, Lindsay Weirich. I will include the youtube addresses so you can watch their techniques. This is really a fun exercise. 

Start by taping paper down to a board so it can be tilted and warps less. Prop the board up at a slight angle so gravity can help move the paint. Wet the paper with a large brush. Keep it shiny but not puddly. With a 1" brush paint in some color for the sky. I used quin gold, quin magenta, and some paynes gray with French ultramarine. You can do this on the diagonal or horizontal or vertical. Then I put in some horizontal swishes of color in the bottom. I want to leave as much white passage as I can at this point. then, while it is still wet, use a flat brush to put some distant trees or bushes in the foreground. Have a clean thirsty brush handy to soften the bottom edges if they become hard.

Dry thoroughly. For the trees, spray some dots of water over the sky area. With a rigger brush, draw some tree trunks through the water dots. The color should spread a bit but still leave the impression of tree trunks. With a wedge cut from a kitchen sponge, and thoroughly saturated with paint, sponge in some tree branches. Don't overdo tis part. You want to leave plenty of space between branches for an airy look. 

You may have to use that thirsty brush to soften bottoms of trees as you go to maintain the foggy look. Have fun!!

David R. Smith
https://www.youtube.com/watch?v=sLlr_kdhYqM

Frugal Crafter
https://www.youtube.com/watch?v=BbxTdJJKrfQ