Monday, September 16, 2019

Cathy Johnson's hand made journal

I don't normally post a blog before I do it in class but I thought it would be useful for you to see this before class.

I am posting a link to the video in which Cathy Johnson shows how to make a maze journal.

(4) Make a Super-Quick No-Sew Folding Journal - YouTube

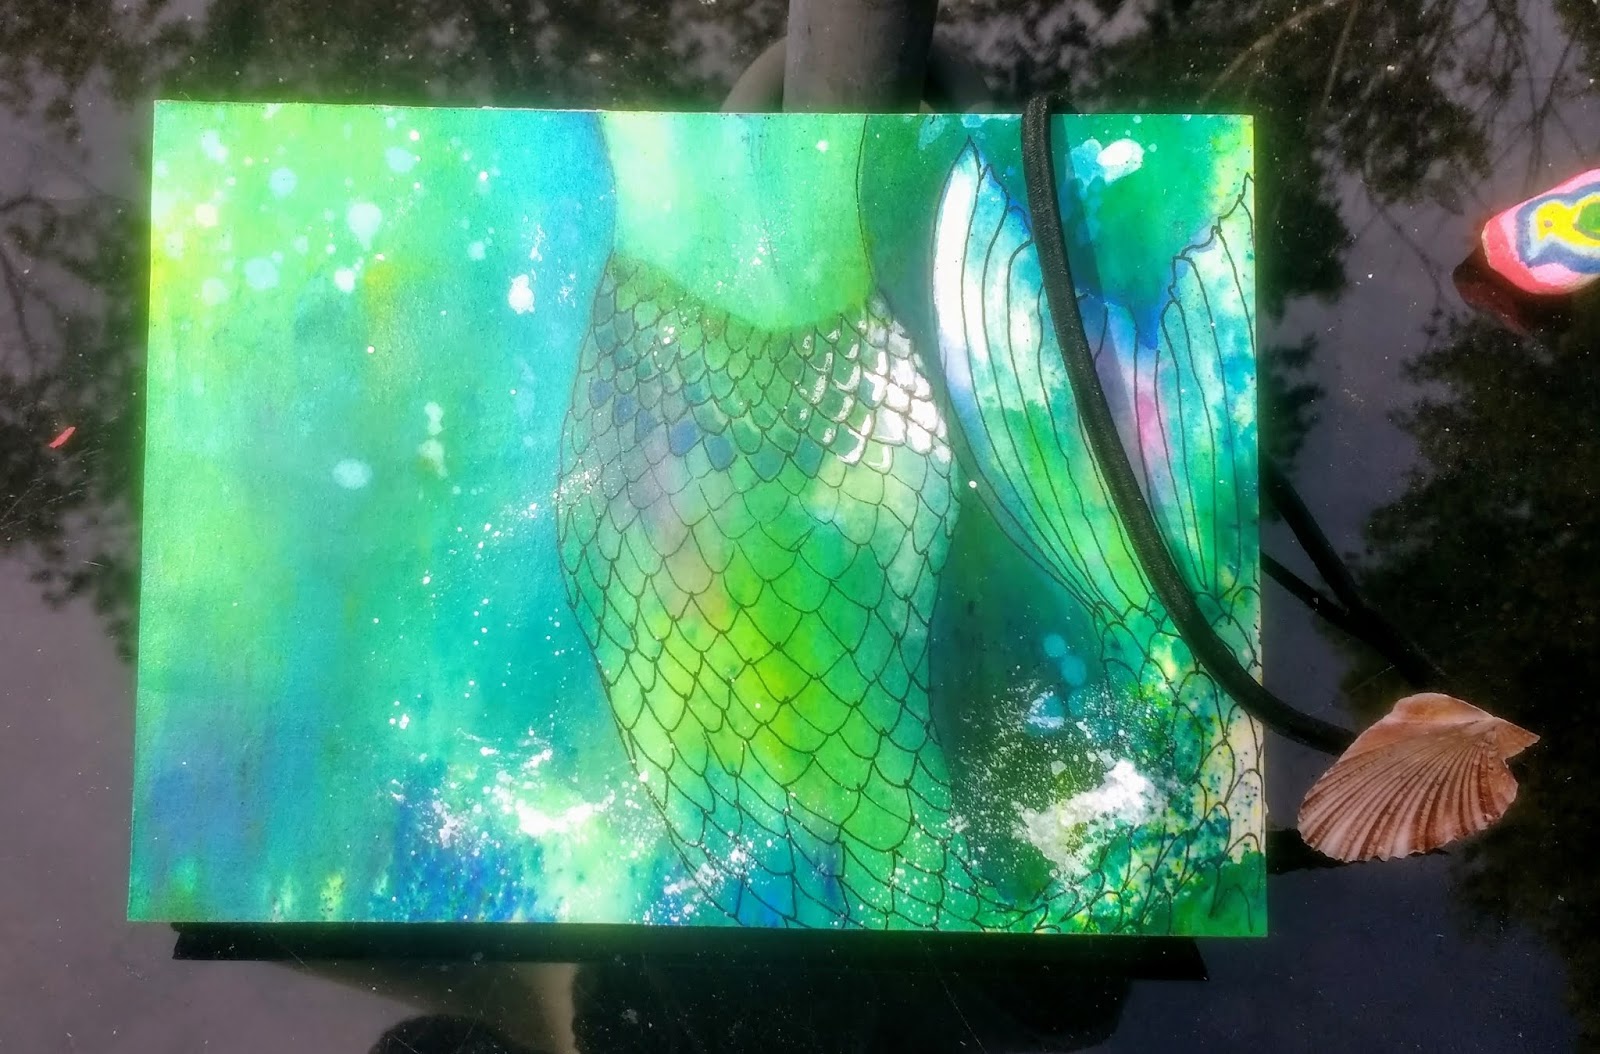
This is how mine turned out. For the cover I used a painting that I did with brusho, but wasn't completely happy with. I cut it in half, used the top of the mermaid for the front and the bottom tail for the back.

Front


Back


Pocket made in middle of journal


I sealed it with varnish after adhering it to mat board cut to 5 and 3/4 inches by 7 3/4 inches. I used wax on the back, just to see how it looked. I put the gel in the hair and glued on crushed shells. For the band to hold the journal together, I used a headband and glued a sea shell to it.

This journal is landscape, but you can make it portrait just by cutting it differently. (Instead of cutting lengthwise as Cathy Johnson shows, cut it on the short sides). It is 5 1/2 by 7 1/2 inches. You can also make it completely accordian, if that's your preference.

So now I'm excited to see what you will come up with for covers. Here are some ideas:

Greeting cards you love
Masa paper
Messed up paintings
Pieces cut off yupo paintings
Wall paper
Wrapping paper
Cloth scraps
Collage

Supplies needed:

22 x 30 sheet of wc paper
I used 90 lb saunders Waterford.-- I'll provide that in class

Pieces of mat board
Craft knife and sharp blade
Straight edge
Glue (or Modge Podge, matte medium, etc.)
Embellishments


Friday, September 13, 2019

Combining Water Color and Pastels

I have done a few pictures in which traditional methods of correcting a problem just did not work. So if watercolor pencil, gouache, or fluid acrylic can't fix a problem, try using some pastels.

Here are three examples of rescuing a sinking ship with pastels.

This portrait of my youngest grandson, Noah, was begun on Arches watercolor board. I expected it to have the same qualities as my Arches paper, but it did not lift. So when I went to put in highlights in the hair, and the paint did not lift, I was a bit at a loss.

So if you look closely, the highlights in the hair have been done in pastels. And, because I didn't want a glaring difference in mediums, I added pastel highlights in the yellow chair, on the green shirt, and a bit on his thumb. I was having so much fun with it, I had to stop myself from overdoing it!


The masa paper iris below, Myra's Bouquet, got a 2nd place prize in its category at the 2019 regional show, and surprised the heck out of me. I started out with a masa paper wash that I already had and rejected before because it had a big purple blob in an inconvenient place. When it was finished, I felt like that blob still needed some calming down, and the buds needed to fade also. So I used white pastel to calm down those areas. Then, to bring some blues into some areas, I rubbed blue in the sky on the right, just lightly over the creases, to give a slight batik look. 


This little guy I did as a class demo to show how you can use ultra fine sharpie, in this case brown, on masa paper to create a bit of a pen and wash effect. I lost some of the softness around the neck, so I went over it in white pastel. I used some yellow to highlight the beak and legs. I used some oranges, reds, and greens to add color to the leaves. And there is some red pastel in the neck area, brown to create even more texture over the rocks.


I love how pastel and watercolor look together. 
But be careful when you want to mat and frame your piece. Pastel needs to have a spacer between the mat and the picture to allow stray bits of chalk to slide down and not collect on the mat or frame. 

Some people use a fixative on their pastel pieces, and others do not. But they DO need glass to protect them from the elements. 

FIINISHING THE MASA PAPER ELEPHANTS

My little smiling elephant.

Now that he's done, I have to say that I would do things a little differently if I did it again. I think I have a bit too much space at the top of the painting...I would move it up an inch or more. 


The final part of preserving the masa paper elephant was different from what I used to do when mounting without glass or frame. First of all, because of the crinkles in the paper, using a spray varnish wasn't enough to get into the nooks and crannies. Secondly, I couldn't use beeswax, also because of the texture of the paper. So, here is what I chose to do.

First I put a coat of Krylon Kamar varnish. (it is archival, doesn't yellow, and says it can be used on watercolors) This first spray coat "sets" the paint so that it doesn't smear on further applications of varnish.

If you want to paint in any changes, you can at this point, with fluid acrylic or watercolor pencil. or ink.

Second, I used Golden's Polymer Varnish with UVLS (Satin). It is a clear liquid, doesn't have a strong smell, like sprays do. You mix it 4:1 with water, then brush on the painting to coat it. I dried it overnight, then coated it again. Costs around $16.

Golden's makes a spray varnish also in matte, satin, and gloss. They also make a liquid varnish that is a little less expensive than the UVLS one that I could have used.

If this had been a painting on normal Arches, I would have followed the procedure in the videos: spray varnish first, then coat with beeswax (Dolmar cold wax or Gamblin's cold wax), dry, then buff. The cold wax costs about $9 for 8 oz, which is enough for probably six paintings.

Below you see the products used for varnishing a painting that is mounted without glass or frame.
The painting behind it was varnished with kamar then later buffed with beeswax.


Artist Kim Fjordbotten explains why you might want an alternative without glass or frame, then gives a simple explanation of how she does it. About 11 minutes.

(4) How to Varnish a Watercolour Without Glass - YouTube

Angela Fehr gives a good description of using heavy gel to glue down, Kamar varnish to seal, then wax to give final coat

https://www.youtube.com/watch?v=XHeDltkj9_M

A 9-minute video with Dennis Clark.

https://www.youtube.com/watch?v=g8TEzRfrtWw

Brienne Brown demonstrates mounting on board

https://www.youtube.com/watch?v=UGaDh7lffYk


Sunday, September 8, 2019

Elephants: masa paper wrapped on gallery board

I wanted to see if I could 
mount a masa paper version of the elephant on a gallery wrapped board (not canvas). This is how I began:

Before wrinkling or wetting the paper, I drew the picture on with ultra fine sharpie. Then I wrinkled the paper, soaked it in water, and washed over the background with cerulean blue, quin coral, and azo yellow. 


Before mounting the picture, I began darkening some of the areas, specifically the elephants in the background and adding more warms to the foreground elephant; also the dark crevices in the rocks.


When I got as far as I could without mounting, I began to mount the painting on 12 x 16 board.I used YES paste. I smoothed it on over the main surface OF THE BOARD (not the paper) and spread it with a squeegie, making sure it was completely covered. Then,  I placed the painting onto the paste, covered it with wax paper (or parchment paper) and smoothed the painting out from the center to the outside. Use a breyer or rolling pin to work out the wrinkles. 

Then, one side at a time, spread the paste onto a side and smooth down the side, also using the wax paper and breyer.

When all sides are smoothed down, you can cut off the extra edges with an exacto knife.


I have a little more detail that I want to add, but not too much. Then I will show how to varnish the surface so that it can be hung without glass. 

Sunday, September 1, 2019

Finishing the Elephant: Grisaille method

AFTER PLANNING THIS PAINTING, I decided to try it using the grisaille method. For the gray, I used Daniel Smith's Neutral Tint on 300 lb Arches cold press. 
Remember, in grisailles, you paint the values first in either gray tones or burnt umber.

Just beginning to apply the gray values.


Finished the values with Neutral Tint. Anything I want pure color I left white. I actually liked the black and white so much, I almost didn't put color on it. I did miskit some rough hairs on the back of the front elephant. 


First a wash on the rocks with some raw sienna


A warm background with azo yellow and quin coral. Also painted some salmon color on the trunk and body. (salmon made with azo, quin coral, and raw sienna)


Finished with some blues on the foreground elephant and the water. Added some greens in the background and some more shadow on the rocks. Removed the miskit. 


Normally, your warm colors will come forward. But since this is a warm dominated painting, using the cool blue grays against the warm brings it forward, especially since it is harder edged and has more detail.