OVERWORKED PAPER SOLUTIONS
The dilemma: You've spent hours on a painting and you're happy with most of it. But an area got overscrubbed. Or something is too dark. Or you spilled coffee on it.
The fix: It's always gut-wrenching to work so hard on something and one little area keeps it from
being perfect. There are a few things you can try before you give up.
In the April 2020 Watercolor Artist Magazine, artist Kathleen S. Giles has a few suggestions.
1. White paint, Chinese white
2. White gouache
3. A watery coat of gesso.
The coat of gesso is the one I'd never tried. You have to water it down, though, or the watercolor will slip and slide on it. You can actually use it as a glaze to just cause the color to calm down or be tinted. Or you can use it on an overscrubbed area so you can paint on it again.
I have also tried something called "watercolor ground." Ground creates a surface that willl accept watercolor. It can be used on a lot of surfaces: wood, ceramic tile, glass, canvas, etc. It comes in black, white, transparent, buff titanium, pearl, and gold. It's one drawback is that it has to be dried (or cured) for 24-48 hours before you can paint on it.
Something to be aware of, whether using ground or gesso, is that the texture resulting from them, may be different from your paper. You can sand it down a bit, or take advantage of the texture change. Since I do a lot of portraits, that's something I have to be aware of on a face. But if it's part of a background, a piece of clothing, a wall of a building, texture change might be interesting.
You can use the ground to paint over something or as a glaze.
Suppose something got onto your white background and caused a stain that can't be lifted. You can use an opaque white paint, toned a little to match the shade of white of your paper. I have used FLUID ACRYLIC white. I have to be careful that the sheen on the paint I use to cover the stain isn't different from the rest of the painting, especially if it will be photographed. (the lens will show the difference)
My problem with gouache (and Chinese white) in general is that it looks chalky when you try to paint over it. As a final touch, I use it when needed, but I don't paint over it. Others may have that problem licked, but I haven't figured it out. For small bits of white, I use either a gel pen or permanent white ink pen.
But this article was very interesting and worth some experimenting.
Thursday, June 25, 2020
Playing with Wet Into Wet
FOR A SIMILAR LESSON, SEE THE ZEBRA POST FROM APRIL 21, 2017.
Here is a simple lesson that introduces four basic watercolor techniques:
wet into wet;
lifting color;
glazing over color;
and using primary colors (red, blue, yellow) to create secondary colors. (orange,
violet, green)
1. Draw a simple picture with one large shape (such as the pot) and other smaller, longer shapes.
(such as the aloe stems)
2. Make a "puddle" of each color you want to use. This will prevent having to constantly rewet paint. The thicker the puddle, the darker the paint will be.
3. Using clean water, wet one of the shapes. You want it to have "shine," but not be puddly.
4. Apply one of your colors to the end of the shape. Then, just below it, apply another color. Let them run together a bit until a secondary color forms between them. I started the far left leaf with cobalt teal blue; I added magenta beneath it and let them run together to make purple; then I added yellow beneath the magenta to make orange. You just keep going, changing color every 1-2 inches. (if it's a small painting)
You can try painting some of the stems without wetting it first (wet on dry) to see the difference in the flow of the color.

Below you see all of the leaves of the aloe done.
Here is how the pot is done.
Wet the pot, using a flat brush. Put a vertical stripe of warm color (in my case yellow) down the middle. Then add a stripe of red on each side of the yellow, allowing part of the yellow to become orange. Next to the red, add blue on each side.
While the paint was still wet, we took a "thirsty" brush to lift paint off the lower rim of the pot.

When the pot and leaves are dry, you can experiment with lifting and glazing.
LIFTING
To lift, your painting needs to be completely dry. Wet a "scrub" brush. (you can buy a pack of these from Hobby Lobby for about $4) To remove paint that may have gotten out of the lines, gently apply clean water to the area with the brush. Give it a few seconds to soak in and loosen the paint. Then gently rub back and forth with the brush. Blot with a tissue.Too much scrubbing can remove the sizing from the paper.
To lift a hilight, or to blend colors a little more, apply clean water to the area. Give it a few seconds to soak in. Gently brush the area, then blot with a tissue.
GLAZING
Often artists will use glazing to unify a painting. Glazing is just applying color over a dry layer of paint. It can be the same color or a different color. In this picture I glazed over the entire pot with yellow. (that is why the sides look green instead of blue).
Monday, June 15, 2020
Ohn Mar Win and brushes
Just a few words about Ohn Mar Win.
She is from England (I think Vietnamese?) and is what is known as a "surface illustrator," meaning: she illustrates things such as cookbooks, fabrics, etc. She has her own unique pen and wash style, so this blog is for those who love all things pen and wash.
Ohn Mar has a blog, is on instagram, and her web site is ohnmarwin.com. She teaches on Skillshare, if you are interested in seeing her there. Her blog covers a lot of art topics, worth a look.
I tried to share some of her work here, but my blog has been bogged down for some reason, and I'm having some difficulties with it.
Also need to mention Escoda brushes, which several students love. They hold a lot of moisture but can come to a thin point for finer details.
DRAWING ADVICE?
This will be brief. I stumbled on this ten minute youtube from an Aussie artist about the
best drawing advice he's ever had. But really, it's not just about art, but about life.
Some of you will watch it and say, "I knew that," and nod your heads in agreement.
For others it will be a bit of a self-revelation about what holds you back. The blogger is
called "struthless."
To sum it up, he asked an accomplished artist why he wasn't getting anywhere. The artist (Mark Schattner) told him he was too scattered. His advice was to pick one thing and draw it every day. See what evolved from that.
I loved his 4 points:
1. Quantity leads to quality ("laying a single brick for a million houses won't build a mansion" but, building a million bricks into one house will)
2. doing something specific promotes constraints for creativity (fighting the White Page)
3. Actions comes BEFORE motivation
4. Thinking is not doing--it can be a form of procrastination that leads to nothing accomplished.
(check out his donkey story)
I don't usually read comments, but so many others liked this video, that it led me to include several quotes:
“I am not afraid of a
person who has practiced 10,000 kicks, but I am afraid of a person who
knows one kick but practices it for 10,000 times.” - Bruce Lee
We also
protect the ideas in our head because they're perfect in there. Complete, owned
and most importantly un-criticized.
This
reminds me of a quote from Chuck Close that goes something like, "every
good idea I've had grew out of the work itself. Inspiration is for
amateurs."
do the same thing every single
day- that sounds exactly like learning a martial art - chinese proverb:
"talk does not cook rice"
Monday, June 8, 2020
LOOSE TECHNIQUES ON BUILDING
ONE MORE TIME: TAKING NOTES ON JEAN HAINES TECHNIQUES
Most of these techniques I've used in one form or another. But, I've never combined them the same way that Jean Haines does. So here is my exercise/practice using some of them on a building.
#1 Using a card to create background, straight lines.
In the violet vase picture, she used a card (or scrap watercolor paper) to block
out the vase and create the background. Here, the card is used to cover the building and create some background. I placed the card to the left of the blue background, and holding the brush farther away from the brush end, painted in blue, stroking upward to the right. I removed the card and continued to work on the background, adding green for leaves and some purple, trying to keep the colors cool on this side.
I also used a card to create a diagonal at the bottom, and just stroked upward with blue and purple.
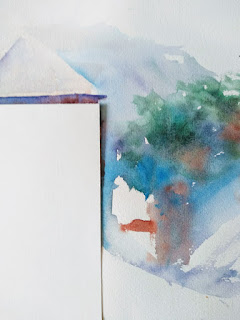
I covered the roof with a card and painted a light blue over the sky on the right. Then I worked on
the texture of the building. I used a card to mark the topof the building (covered the roof). I painted in burnt sienna and ochre; salted while wet; then
STRETCHED some plastic wrap over the salted area. While I've used salt and saran together before, Stretching the wrap to make the lines straighter was different for me.
(Picture with wrap on)

Wrap off.

I painted the side of the building with the same colors, using same colors, but only salt.
So you can see the difference in the tetures. The saran wrap holds the salt in place, creating
an old building texture.

Using the card again, I painted the shadow underneath the roof and the side roof.
I finished all the roof, holding a card at different angles.
I also used the card to create the top of the window and the line underneath it.
I painted in a loose tree on the left. (Not my best)

This is as far as I got. There's a lot I like about it. I forgot to say that, as I put in greens for the tree, I allowed some to bleed into the side of the building, just as I let purple from the iris bleed into the wet leaf. (previous blog)
I did enjoy using the card to create straight lines.
There was a good question: why not just use tape to tape off lines? You could use tape. (In fact, that's
probably what I would have otherwise chosen) But there really is a sense of freedom to using the card, not having to wait for paint to dry to remove tape. You can also make decisions quickly instead of all planned out. Plus, I did not draw one single line on this painting.
(sketch plan below on sketch paper--none sketched on watercolor paper)
Try this...I think you'll have some fun and feel a little looser when painting a building.

Subscribe to:
Posts (Atom)