A friend gave me permission to use some of her hot air balloon photos for a lesson on creating light and volume in watercolor class. Here are two of the photos and the sketch I made from them.


I am trying to show how to create a feeling of sunlit highlights and shadows and volume, using these balloon sections. For each section (except the white) I used two colors, a warm and a cool. For the blue sections I used pthalo and ultramarine; for the reds I used magenta and rose dore. The white shadows are done in ultramarine.

Yellow sections: hansa yellow and quin gold or nickel azo yellow. Orange sections are quin gold, coral, and quin burnt orange. The important thing is to use analogous colors in each section. (colors close to each other in the color wheel)

Visualize and mark lightly where you want the hilight to be on each section. For me, the highlight is on an arc about 2/3 up from the bottom.
This is a wet into wet process. Carefully wet one section at a time. Apply the light yellow first. While it is still wet , apply the darker color at the ends, letting it move toward the center, or where you want the hilight to be. Where you drop the paint in first will be darker. While the paint is still damp, paint the darker color in the creases. This should make the individual sections seem to pop out. The vertical center going from top to bottom should be lighter than the creases; the highlight should be lighter than the top or bottom.
Work in every other section to prevent painting into a wet area. Continue this method with each color. You can go over areas after they dry if it's not as dark as you'd like.

HERE IS A SECOND METHOD OF GETTING VOLUME AND SHADOW
On this smaller balloon, I first wet the balloon, then painted a base of blue and purple wet into wet.
I kept the darks on either side of the balloon, allowing the center to be lighter, catching the sun. DRY COMPLETELY.
On the pic below, you can see how I've separated the center section already, using a dry method. (meaning, the paper is dry when I add paint)
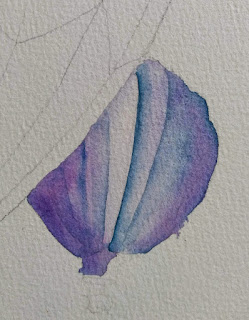
To separate a section, I painted a thin line of blue.

Before that can dry, I use a damp brush and run it along the edge of one side of the section.
I am trying to loosen the paint and soften one side. To do this, I have to give that paint a place to go. So my brush needs to be wet, but not drippy wet.
Doing it this way, you create one hard edge (against the dry paper) and one soft edge, which blends.

Below you see all but one of the sections separated by this dry method.

MAKING CORRECTIONS WITH LIFTING:
If I am going to put another color, especially if it is a darker color, next to an area that I've gone out of lines, I don't worry about it...I just paint over it with the next color. But if you need to remove some paint try this lifting method. (there are other methods)
The area must be completely dry. Using a small stiff brush, brush some water onto the paint. Let it sink in and loosen the paint for a few seconds. Then gently move the brush back and forth over the area and blot. You can also do this to lift some color off an object where you want a highlight.
After I painted the balloons, I wanted to paint the sky. There are different ways to protect the color of the balloons, but here I used contact paper and packing tape.
EDIT NOTE: Only use clear packing tape or contact paper on 100% cotton cold press paper. If using something else, test it before using adhesives. It will tear some papers and leave residue on others, such as some hot press, Strathmore Aquarius II, etc.)
I put some contact paper or packing tape over the balloon areas. I sealed it and removed air bubbles by rubbing over it with a credit card. Using a craft knife, I gently cut the tape around the balloons, and peeled the tape off the sky area, leaving balloons covered with tape. I could have protected it more by sealing the edges with masking fluid. (The shine you see below is the tape/contact paper)
I also put a tiny square of tape where the baskets are going to be.

Taping things off allows me to do a smooth wash for the background. I just put the paper on a tilted board (about a 15 degree angle), and wet the area of the sky. I washed cerulean blue over the sky.
When it dried, I peeled off the tape, as you can see below.

FINAL DETAILS
I painted in some grass and trees and some shadow underneath the deflated balloons that are on the ground. I put the stripes on the middle balloon with a flat brush, being careful to curve the stripes to keep the feeling of roundness in the balloon sections.
That baskets beneath each balloon is done with burnt sienna with some blue painted over the bottoms for shadow.

I chose this project because it gives so much practice in showing how to create a luminous hilight. But if it didn't come out, no fear. In watercolor, I may show you a way to accomplish something, but it is never THE only way. You can achieve this rounded effect by lifting at the end, if you want to. You can also "round" a flat-looking area by glazing over parts of it. But this is my favorite, most clean looking method.
No comments:
Post a Comment