This is an extremely simplified example of how to do a wax batik on rice paper.
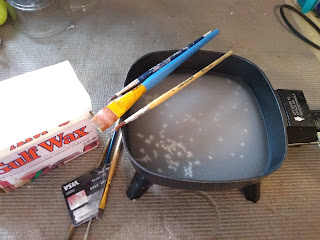
SUPPLIES: rice paper (kinwashi or unryu thai, about 25 gsm) (10 gsm us too thin)
a small electric skillet or crock pot to heat wax at consistent temp.
paraffin (Gulf Wax)
a set of brushes that you don't care about, because they will never be used for anything else
butcher paper (or foil)
water colors and large watercolor brush
STEP ONE: THE "MAP"
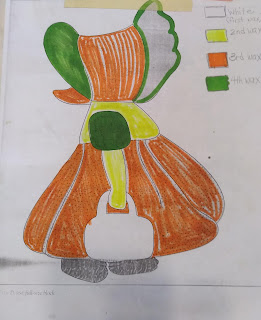
This is the planning part, and takes some time and careful thought. Draw a small version of your picture. Find your different values. You can use a program such as Notanizer or photoshop to help you decide on the values from a photograph. Assign each value a color. On the "map" below, you will see that white is for white....the first thing that will be waxed off. I used yellow as my second value, and the second thing to wax off. (this does NOT mean I will paint it yellow: it's just that everything in yellow will be waxed next before painting another value) Orange is my third value, and the third thing to be waxed. Green is the last value to be waxed off.
As I said, this is VERY simplified, so I only used 5 values. You will need to decide for yourself how many values you will need. In more complex pictures, it is easy to lose track of what you should be waxing/painting, and a map will help you through it.
DRAW or trace your picture onto the rice paper. You will want to draw dark, as the wet process tends to lose the pencil marks.
Set your drawing on the waxy side of butcher paper (shiny side of foil). This will protect surfaces from the hot wax and will allow you to pull the painting away from the butcher paper when done waxing.
MELT your wax at a safe temperature. (190 degrees is about right) I set my mini-skillet for a little before the half-way mark. It needs to be hot enough to melt the wax to a clear liquid, but not so hot as to cause smoking. You can start a fire that way, and it's not a pretty sight.
Using a brush set aside for wax (I like a 3/4" flat) dip the brush into the melted wax and apply it to everything you want to stay white. Use smaller brushes for smaller spaces. Feel free to spatter wax or drip it.
I've learned 3 things about applying the wax. First, you just can't control it completely. Second, if you set the waxed brush down close to but not ON the line, you can get more accurate. The very hot wax that first comes off flows more, and after a second becomes a little more controllable.
Try different tools for applying wax. Besides brushes, you can use the wooden tip of a brush or skewer that has been clipped. There are also tools called "tjanting" that are like little scoops that hold the hot wax. They make electric ones that keep the wax hot, but cost about $50. I know Blicks carries the wooden ones. Experiment.
Third thing I learned (the hard way) is to make sure the wax goes through to the back of the paper. If it doesn't, you can get paint bleeding into the back of the paper, which will show through. If this occurs, just rewax those areas on your next layer.
FLIP your butcher paper to the dull side and put that under the picture to PAINT your first value. This will help absorb the paint that comes through the thin rice paper. You can control the color to some degree, but the beauty of this process is letting all the colors run together. You are looking more for a uniform first value than specific color.
Below is my first wax with the first wash.
You will be surprised at how LIGHT the paint will dry on this first layer.
DRY the painting, then apply wax to the first layer of paint to create a new value. Here you can see I've waxed over areas my map had in yellow, then applied another layer of color and value on. Trying to get darker with each value change.
(You can also see some "bleeding" where the wax was not thick enough, so paint bled on the underside)
This should be fixed as soon as it is noticed. After a wax layer, look at both sides in the light, and feel for wax on both sides.
Dry each layer completely before doing the next wax layer.
Below I've waxed out everything marked orange in the map, and painted more values into the unwaxed areas, namely the bonnet and creases in the skirt. I'd also left thin lines around the arm and purse to create a bit of an outlined look.
This process is repeated until you have all the values you want in your painting.
Next week:
Finishing the last layer of wax; crackling effect; removing the wax; mounting on paper.


No comments:
Post a Comment