Last week I posted the beginnings of a landscape with lots of grass. We didn't get to finish, and I wanted to concentrate on different methods of painting grass.
I had included links to 2 different youtubes, and I hope you were able to watch them. This week I'm going over them (some of them) and explaining my favorites.
#1 Here is a way to create lighter grass. Paint light green or yellow and let it dry. Then apply masking fluid in grass shapes. Let the masking dry completely. Then paint darker green over that, and let it dry. Lastly, remove the masking fluid and you will see the lighter grass blades show through.
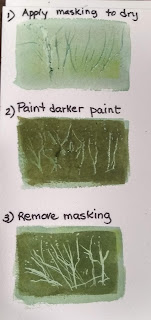
NEW TIP : I saw someone using an old-fashioned dip pen to apply thin lines of masking, and I thought it was genius! So I've been playing with my dip pen and loving it. Masking fluid removes easily after it dries. Plus, I've discovered that I can dip it into watercolor and use it to sign my name or make tiny thin marks. Love it! (from Amazon with 2 pens and 6 nibs: $10)
#2. Well, I'm going to pat myself on the back for the next method, because I've never seen anyone use it except me. I'm not a genius, but I really like this method for several reasons. The first is that I am not constantly reloading my brush; second, I get several colors of grass at once; third, the grass feels very anchored to the ground.
This is the top left method. You tape a piece of masking tape below your grass line. Drop puddles of green and yellow colors directly onto the tape, not the paper. Then drag a thin brush or silicone tool through the wet paints in flicks, bottom to top. As your brush goes through the paint on the tape, it picks up several colors at once. You can see in the picture I've removed 1/2 the tape so you can see the result.
(Jackie reminded me that you can also blow through the puddles with a straw and make some very interesting grasses that way. Sometimes we forget what we know!)
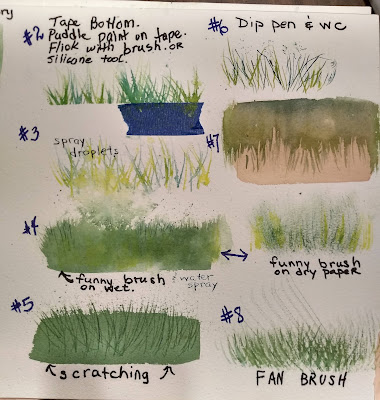
3.) Second left method: Spritz a few droplets of water onto white paper. Use a rigger brush to drag paint through the droplets. You will still get grass whisps, but as the paint goes through the droplets, it creates effects.
4.) Third down on the left: Cut up an OLD brush, even a bristle brush, into hacked uneven chunks so that some bristles are longer than others, and there are separations. You can either drag it through wet color (as on the left) or dry brush, as on the right. There are actually brushes made for that, and they are named in one of the videos I sent.
5.) Fourth on the bottom left is scratching or etching into the paper. This is done while your paint is wet. Apply wet paint and use the sharp tip of your brush to scratch grass shapes into it. The etched part will begin to pool with paint, making it darker. If you use a credit card's rounded edge or a palette knife, you can make shapes that leave white by scraping into the paint.
6. On the top right is using watercolor in a dip pen. Just fill the pen with watercolor paint and away I go. The results are very fine lines. (TIP: this can be done on cold press, but works better on hot press because of the smoothness of the texture) These pictures are on cold press.
7.) Pictured here is "negative painting." This is done over a first wash of yellow or light green. With darker color, you paint around the blades of grass from the top down. This can be done several ways.
A. You can spread a wash of darker color over the top and use a funny brush or rigger to drag it down into the lighter color. B. Use a rigger brush to paint around the tops of the blades and smooth the paint into the area above it. (If you turn it upside down, it will look like the dark grass is on the bottom.)
8.) Bottom right is using a fan brush. Many people like this, but I think it looks a little TOO even.
You will probably use more than one method in your painting. In this painting, I have an underpainting of light green. I used a little masking fluid after that dried, and colored over it with darker paint. Third, I used a bristle brush to define lines. The final touch was spattering with some yellow gouache after covering areas I didn't want spattered with paper towels.


No comments:
Post a Comment