I found this image on Unsplash by Ahmed Badawy. The eyes are so piercing, I had to try it.
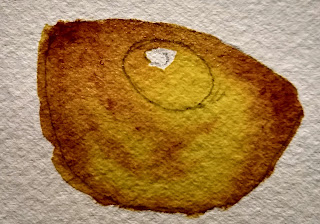
First I had everyone do some "practice" eyes to get the hang of this. They seem to be the most dramatic part of this painting. The colors I used were a medium yellow, (I used New Gamboge with a little hansa in it to cool it off), quin gold, and a bit of quin burnt scarlet, but burnt sienna will work.
I used a size 8 round with a nice tip. Wet the eye all over--except for the tiny highlight--and cover it with yellow. I wasn't being too careful because I knew I was going to outline it all in black. I want it to stay shiny, but not puddly, so had to soak up that puddle at the bottom.
With the quin gold, I gently dotted around the outside of the eye to let it bleed into the yellow.
When doing this, if you will load your brush, and then tap it onto a paper towel to remove excess moisture, you will have more control over this step. The paint on your brush should be
dryer than the paint on the paper.
Using the tip of the brush, start at the top of the eye and tap in some quin gold in a partial circle around the center of the eye. Make another partial circle beneath that. If you want more depth, and the eye is still damp, tap in burnt sienna or quin burnt scarlet around the edges.
Dry the eye completely before trying to add the black. Paint in the pupil with black, hard
edged all around, and leaving the tiny white highlight.
Then, a little at a time, begin painting the black around the eyeball. You want a hard edge around the eyeball, but you want it to soften it a little where the eye touches the feathers.
So, with a small brush, tap the outer edge with some water to create a softer edge, keeping the black by the eyeball hard.
(More on how to make black later)
Here you can see the finished eye. If you want to lift a little light into the yellow later, wait until the eye is completely dry.
MAKING BLACK
There are many ways to make an effective black, and advantages to making your own black.
One is that it is not as "flat" looking as a tube black. Another is that you can make it from a limited palette. And another is that, when you soften edges, you get a variety of color. If you look at the eye above, see the greenish blue hue of the areas where I softened the edges.
Below is a chart of possibilities for making blacks. This is where using tube colors is an advantage. You can squeeze your darkest colors straight from the tube instead of trying to rewet enough color from a palette to get it dark enough.
If you want a dark color, you need to use two (at least 2) colors with dark values. Others not shown on here are indigo and burnt umber; purple and burnt umber with some blue.
Usually you want a warm (like a deep brown) and a dark cool.
FINISHING THE OWL
Paint in the beak leaving the highlight along the middle. As I painted the dark, while it was wet, I used a tiny brush to paint in some feathers along the beak, painting from the beak into the feathers,
FOR THE BODY: Choose 3 colors that appeal to you. Get creative. I tried to use two cools and a warm that was close to complement of one of the colors to neutralize areas. For example, the one below used jadite (a deep green), Ultramarine blue, and for the complement, lunar earth...which also gave me tons of sediment. (You could use 2 warms and 1 cool complement also)
This one used purple, ultramarine, and quin burnt scarlet for the complement.
Starting with the head, I sprayed lightly, leaving droplets of water on the paper. I used a fairly large round brush (or mop) and dropped in my colors, avoiding the white areas around the eyes and beak. While wet, I sprinkled in some kosher (pretzel) salt, which gives that feathery look on the head.
When I was happy with that, I did the same on the body of the owl, leaving small patches of white. Where paint dried before I could put on salt, I spattered clean water to try to get some backruns and texture.

This is as far I we got in class. Next week I will show a few ideas on finishing the owl, although I kind of like it as is.


No comments:
Post a Comment