Thursday, June 17, 2021

S.O.S. FOR FAILED PAINTINGS

 This post is for paintings that you have tried everything on, but can't seem to save them. When you are desperate, ready to tear it up, and the painting has lost its life....but there's still an element worth trying to save.

These are, by all means, not the only measures you can take, but they might take you in a different direction. 

#1 RECLAIMING WHITES

Sometimes you overwork the paper, lose your whites, and the paper loses its ability to control the paint. You might consider using a WATERCOLOR GROUND. Golden, QoR, and Daniel Smith all make ground, which turns your surface into one that will accept watercolor paints. You can use it on wood, plastic, glass, paper, etc. 

If you are just covering a small amount of paper, just paint the ground over the paper that is ruined. Then you have to let it dry 24-48 hours. The directions tell you this, and believe me, you need to wait.Don't use a good brush to apply the ground. If you don't want to see brush strokes in the ground, roll over it with a small sponge paint roller. If it is still rough, you can use a little fine grit sand paper to remove the roughness.

Ground comes in several colors: Titanium, Transparent, Pearl, gold, black, buff, and others. I have used the black before to get a very black background that doesn't show brush strokes. In the yellow rose below, I tried to get a good black background, but the paint seemed uneven. The black ground was a great solution. (This was a rose tutorial from Louise DeMasi, but she had a white background)


White gouache is often used as a solution for adding whites or covering errors, especially in spattering snow in a snow scene. It is opaque. But you wouldn't want to try to paint over it, as it will make your paint look chalky. 

If you just have a few tiny whites, you can try a white gel pen or pastel pencil. 

Another possible product is called Bleed-proof White. Dr. PH Martins makes it, and so does Luma. In class I gave everyone a strip of paper with ground on one side and bleed-proof white on the other. They are both opaque and cover nicely. Bleed proof white will get chalky if you paint over it too much. You can lift on the ground. 

INKTENSE BLOCKS

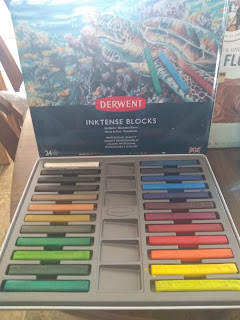
Below is my set of inktense blocks and the color chart beside it.

Always make a color chart, as the colors can be quite different than they look on the stick.

co

Inktense blocks, like the pencils, are designed to create more vibrant colors. They are ink based, however, and can be more opaque (useful for covering over an area of yucky color). You apply them dry, then wet them with a brush or leave them dry for a more textured appearance. By rubbing the side of a block over the paper, you can cover a large area quickly. 

PASTELS

Pastels deserve another mention. Here is a wax batik painting I just finished. I'll go over a few minor corrections using some pastel and some bleed proof white.

Below you can see the sleeve and hand of the woman. I used a little bleed proof white to add some light to the hand; added some magenta to make the hand a different color than the kimono; painted some cobalt on the shadow on the hand. 


On the face, the lips were not defined in the batik. (That happens with this technique...can't control the wax in tiny areas very well)j I needed her lips back, so painted over the area with bleed proof white; let it dry completely; then was able to paint her lips. I also used bleed proof white for the white makeup on her eyes and the white hilight in the eyes. I used black ground in areas where the hair did not get as black as I wanted. Then I used a pale blue pastel to lighten some of the dark on the left of her face.


Final painting.


Another example of using pastel. The left top corner was just a blob of purple on masa paper, and looked awkward. I painted in some buds, but broke up the purple with white pastel. Also ran some blue over the bumps on the right top half. I used a yellow to brighten the iris beards. 


COLLAGE IT

When I originally painted this little barn. it seemed uninteresting, and the area of the trees got damaged looking. Using scraps torn from torn up masa paper paintings, magazines, and batiks, I tore tree shapes and used matte medium on an old brush to glue the torn shapes to the painting. I did the same to the barn. I created some chickens using the printed inside of envelopes, and painted chicken features onto them after gluing them on.

Sandy Maudlin is doing a 3-day workshop in September of 2021 on this collage method. 

Wh


USING RICE PAPER

One of the more elegant additions to a painting that is OK, just lacks pizazz, is using matte medium to adhere rice paper over the painting. Just lightly brush the painting with matte medium and lay a thin sheet of rice paper over it. The rice paper on this one is thai unryu, 10 gsm. They make it heavier, but the lighter weight rice paper is more transparent. I think it is like looking at the picture through a sheer silk curtain. There's something about it that pulls the painting together. (This is a painting that we did a few years ago, and is on the blog)


Before applying the rice paper.


After applying thai unryu 10 gsm rice paper 


Not all rice papers work for this project, but many do. 


THINKING OUTSIDE THE BOX: USING CLEAR PLASTIC OVER A PAINTING

On a whim I used alcohol inks on clear acetate to create a design. Then I began to lay the design over some of my more boring paintings, and thought the affect was pretty interesting, turning a simple study into something that appears more abstract. Below you will see the peppers I painted in the recent blog about shadows overlaid with acetate that has alcohol ink design on it.

alcohol ink on acetate


Alcohol ink on acetate overlaid on the pepper painting


You don't actually attach the two sheets, but cut both to the same size and frame that way.


No comments: