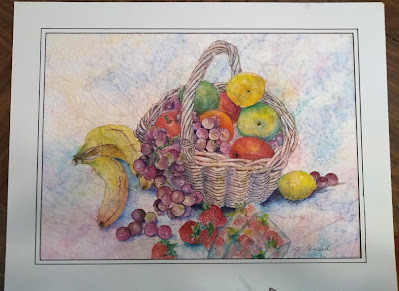
Above is a picture I did recently on masa paper. It illustrates one effective way to use pastels with watercolor. I painted it all over with watercolor, but when I was done, there were parts I wasn't pleased with. First of all, the white basket was looking dull, and I'd lost some whites. Second, the darks in some of the fruits just would not take any more color. The grapes, which ae green and purple, lost their shine in some places.
Adding pastel should be done after any other steps, because you won't be able to paint over it. Because masa paper has a little bit of tooth to it, I did not have to use any surface preparation on it. Also, the areas I wanted to fix were mostly "touch-ups," not major fixes. To bring back some whites to the basket, I used the side of a soft white pastel stick and lightly brushed it over the handle and basket areas. I brightened that rear apple with some red and orange pastel, gently smoothing the color. I brushed in a little bright green on the purple grapes.
BASIC SUPPLIIES
Below are shown 3 ideas to add some grit to paper that has already been painted with watercolor.
First on the left is transparent WATERCOLOR GROUND. It is brushed on over the area you want to add color to, then dried overnight. In the middle is liquitex CLEAR GESSO. This is also brushed onto paper (right over the paint if you like). On the right is a spray fixative. (pastelists might use this over a base painting to set the background and add tooth for the next layers. However, it darkens the pastels, so they mostly do not use a final fixative spray)
Below are the pastels that I use. They are a cheap brand from Hobby Lobby, but they work well for my purposes. On the left are soft pastels; on the right are semi-hard. Other tools pictured are a white pastel pencil, sandpaper, and a craft knife.
Below I'll show some of the before and after pictures that I worked with for this tutorial.
First, left is a bunny I tried and failed miserably with. On him I brushed over background and foreground with liquitex clear gesso. This adds a noticeable tooth. I worked in some whites around the mouth and cheeks. Softened the ears with a lighter blue. Darkened the eyes with black and put shadow beneath the ears. Darkened the tip of the nose. Chalked in a raw sienna background. I used a PASTEL WHITE PENCIL from Caran-Dache to put the white highlights in the eyes. Not finished, but he's looking softer already.
Bunny photo reference
Next is the transparent watercolor ground. This is a product made to help repair over-worked paper or cover a mistake and allow you to paint with watercolor over it. It has to be dried overnight if applying watercolor over it, but you can just use a hair dryer if you are using pastel.
On the left is the daffodil I was painting to experiment with yellow shadow colors. I brushed on some transparent watercolor ground and allowed it to dry. Wet products, such as the ground and the gesso, may make the paint run a little, so just be aware of that.
I used 2 pastel methods on this. First, I used the white pastel pencil to make some of the ripples stand out. Second, I scraped a little green and blue soft pastels into a small container. Picking up a little at a time, I gently rubbed the dust onto the upper right background of the flower. I also put a little bit of green to highlight the stem.
On the wisteria below, I sprayed the entire painting with fixative after painting with watercolor. The changes in this are subtle. I scraped some light green into a palette, and rubbed some into the green areas. Then I scraped some purple and blue and rubbed it on the bottom right, where there was a little flaw in the paper. (Yes, I use my fingers, but you can use a tortillon, brush, or other tool)
Someone asked if you can put water on the pastel. The answer is yes. Some pastel artists set a background by brushing over with water, alcohol, or a baby wipe. I like the baby wipe idea. I also wet an area in the middle and scraped some shavings over it to make a spattered effect.
One last thing you can do with products. You can add some paint to your gesso and brush over it to tone the entire page for pastel, as you see below. If you don't want brush marks in your gesso, you can go over it lightly with sandpaper.
QUESTIONS:
Q: Do you always use a product to add tooth to paper?
A: No, especially if I use masa paper or if it is a small touch-up.
Q: Do you spray a fixative over the finished painting, after applying pastel?
A: No, most pastel artists do not use a final spray because it darkens the color.
Q: Do you frame this differently from your watercolors?
A: I put a mat around it and frame with glass or plexiglas, like most of my watercolors. The mat serves to give air space between the glass and the pastel.
Q: Do you need a lot of pastel colors?
A: Only if you are doing a full picture. Pastels don't "mix" like your paints do.
On the pastel pencils, I only have white, raw sienna, and burnt sienna for now. I use those colors to give highlights to hair in portraits.


No comments:
Post a Comment